

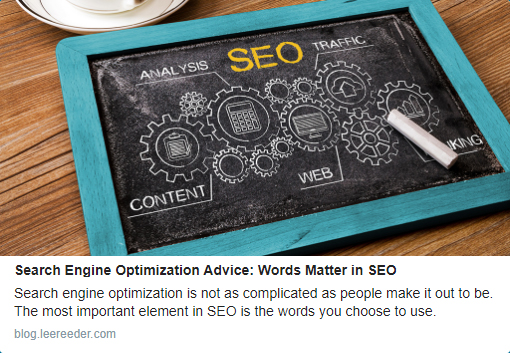
In my previous post in this series on search engine optimization (SEO) I focused on the words you use in both the foregrounds and backgrounds of your site, which is the most important element in effective SEO and getting to the top of the search engines. Now I want to address the second most critical issue—quality links from other sites to you—and we’re going to get social.
Social media is the best place to start in getting people linking to your site. In this arena you have a great deal of control in driving traffic. Your goal (or your website developer's goal) should be to make it easy for people to share content from your site on several social media platforms by simply sharing a link, while ensuring that shared content presents a compelling, professional look. In this blog post I want to show you how to use tools that streamline the process of creating Twitter cards, Facebook articles and other social media posts that make people more likely to click through to you.
First, let's look at what makes this happen, without getting too far into the weeds. About a decade ago, Facebook created something called the Open Graph Protocol. When Open Graph meta tags are placed in the background of a page, they control what Facebook users see when they are presented with a web link—like titles, images and teaser content. Now, I’m not just talking about Facebook here, because a decade later, several other social media platforms grab data from the protocol originally developed by Facebook to make the same thing happen on their sites.
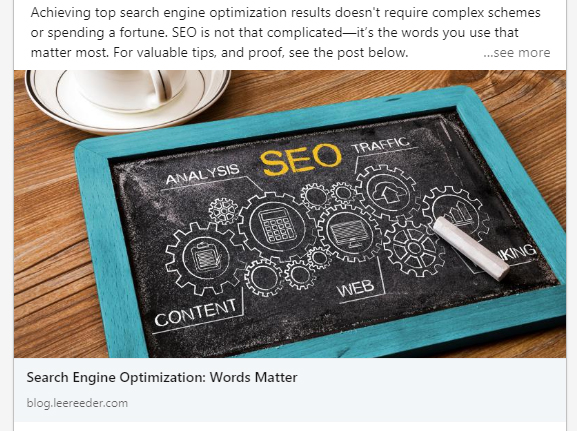
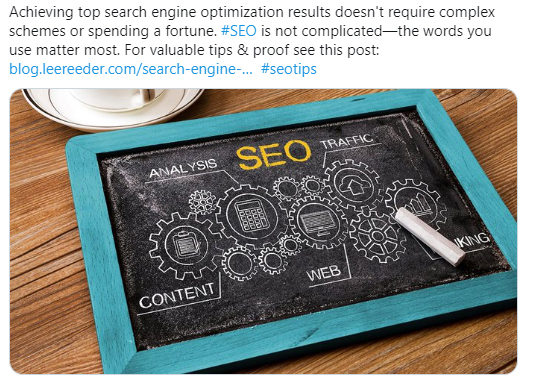
Next, let me explain what Open Graph helps you do, and I will just address Facebook, LinkedIn and Twitter. If you post a link from your site to LinkedIn, and there is a featured image on that page or post that was linked, you will notice that you automatically get a nice preview image and a title below it, and then the site URL, all of of which link to your site (like Image 1 below), and then you can write in your own message at the top. But if you post the link on Twitter, you just get an abbreviated blue link and you have to write your own text for your tweet (see the Image 2 below), otherwise, all you will have is the link. And if you want an image in the tweet, you would have to post one yourself, or the visitor sharing your link would have to add one, which is not going to happen unless you have some very motivated visitor buddies. Also, if you do post an image, it will not link to your article, just to a standalone version of itself (see Image 3 below) and there will be no title, link or content below the image.

When you or someone else shares a link from your site on whatever social media platform, there a few things you want to happen. You want to see a nice post with the featured image, a title below, and maybe even a description of the post or page content below the image, all of which links to that page on your site. Then you or the visitor can add your own message above. Twitter calls these “Twitter cards,” akin to a small advertisement. Studies show that people are 150% more likely to click through if the image and other elements are clickable through to the site.
Now, the good news is that you you can easily set things up to make that happen automatically when someone posts the link on social media. In the past, creating these compelling teasers involved manually placing a bunch of meta tags in backgrounds of your pages. Many developers choose to still do this, but for the masses who are not developers, WordPress plugins make the process accessible.
If you use WordPress, you do not have to manually place this code, because there are several search engine optimization plugins that not only make it easier for you to put SEO meta tags in your pages, they also handle the social meta tags. After a fairly quick and easy initial setup, all you have to do when you create a page is go into your Social Meta settings for that page, create a title and description, and then choose a photo, and the rest is done for you.
If you are already using one of the popular SEO plug-ins for WordPress on your site, you likely have robust social meta options. If you are not using an SEO plug-in on your site (What!?) start right now. The two most popular SEO plugins for WordPress are Yoast SEO (5 million active installations) and All in One SEO Pack (2 million active installations). I have always used All in one SEO Pack, which is the original WordPress SEO plugin, so that will serve as my example. I have researched Yoast and the elements are similar. After you have installed one of these, ensure you activate the social media functions of the plug-in, and then configure the initial setup. This is different for the two plugins and various types of sites so that is beyond the scope of my blog post here. Just follow the setup instructions in either your Yoast SEO or your All in One SEO Pack documentation.
Creating Your Optimized Pages or Posts
Once my initial setup is done, I just do a few simple steps every time I create a page at the same time I'm doing my SEO titles and descriptions for that page.
First, whenever you create a post or page that has a featured image, make sure you also create a version of that image that has an aspect ratio of 2:1. I create a version that is 1024 X 512 pixels, because that is the preferred size for Twitter, and it is also very close to the preferred size for Facebook photos (1200 X 600), and more importantly, they both have the same aspect ratio of 2:1. LinkedIn will use whatever you specify in your Facebook settings.
In All in One SEO Pack, when you are on an individual post or page you're developing, below the page content area you will see a box with your SEO settings like the one below. You will see tabs for Main Settings (the SEO settings) and Social Settings (the social meta settings). After you have done your Main Settings for your page or post, click on the Social Settings tab. Follow along below with the numbers beside the arrows on the screenshot.
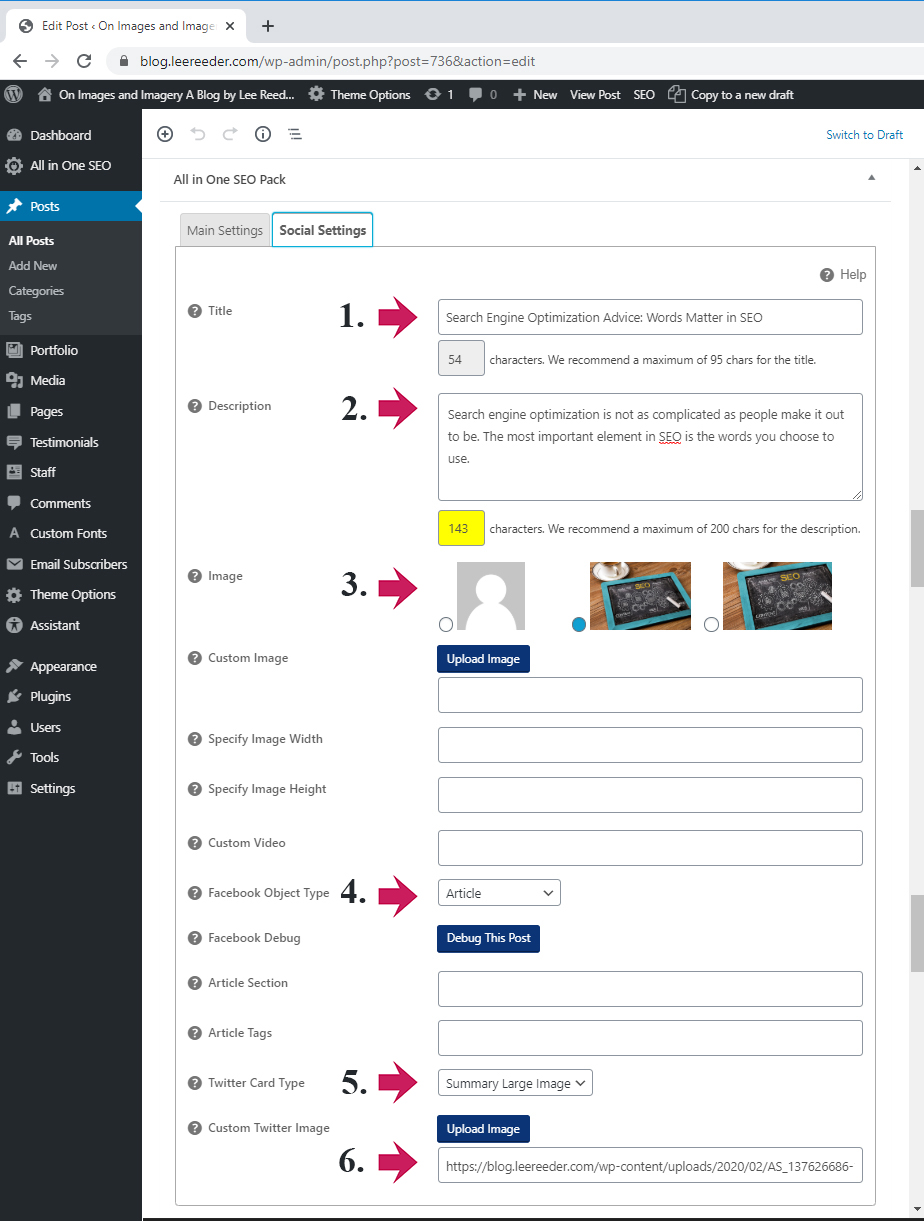
1. Title: In the title, Create a title that you want see below the featured image when your link is shared on social media. Even though you are allowed a max of 96 characters, I like to keep the max to about half of that, which makes a nice balance between the title and the description in my social media shares. (Note, in your initial setup, you can also choose to automatically use the Title from your Main Settings, allowing you to skip this step.)
2. Description: Write a compelling description of the content in the page. Here, you are allowed a max of 200 characters, but I like to keep the max to about 145 characters so the description doesn't run off of the teaser post. (Note, in your initial setup, you can also choose to automatically use the Description from your Main Settings, allowing you to skip this step.)
3. Image: In this area you will see your featured image and other images that might be in the page. We'll come back to this in a minute.
4. Facebook Object Type: Set this to "Article" if it is not already set for that.
5. Twitter Card Type: Set this to "Summary Large Image."
6. Custom Twitter Image: Upload that 1024 X 512 pixel image I told you about earlier and insert it here. Once you do that, save the draft of your page (or update it if you have already published), and then come back to your Social Settings. You will see that your 1024 X 512 pixel image is now shown at the end of the gallery of images in step 3. Click the circle next to that image to choose it for Facebook posts (and all of the other social media sites that use this). The circle will turn blue when selected. You can also upload that image as the "Custom Image" for the Facebook settings in step 3.
Save or update your post.
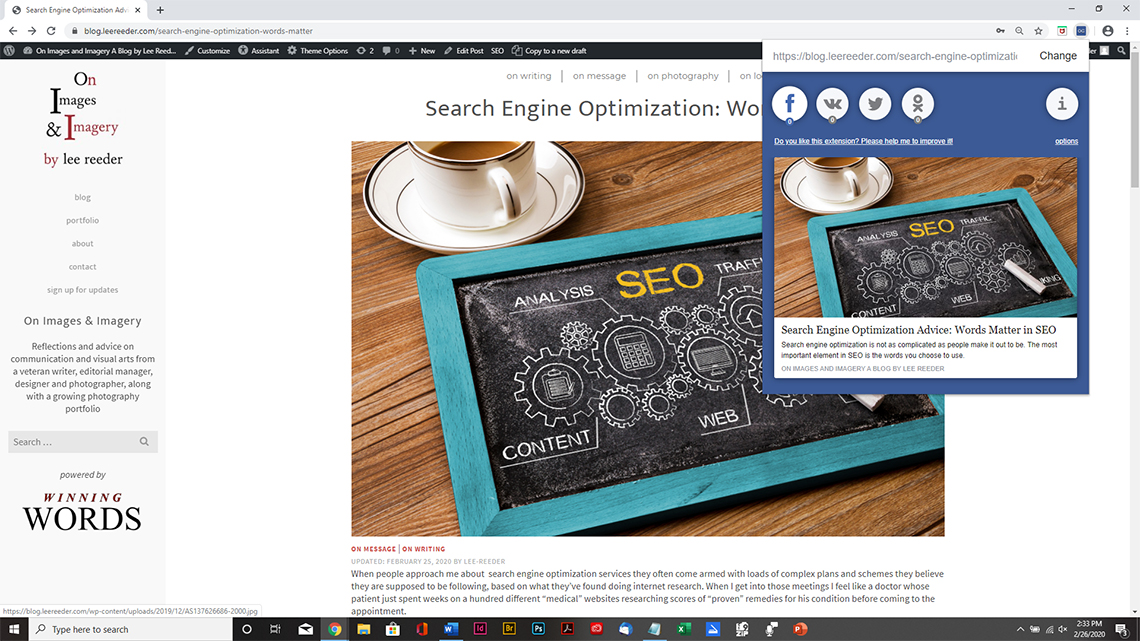
Now, the fun part: previewing what the shared link looks like. Yoast SEO has a preview element built in, and there are many sites for previewing/validating your link, but I like to be able to just view the page I'm working on and see the preview right in the browser. So, to see what my card or article will look like when I share a link, I use a Chrome Extension called Open Graph Preview that shows me a preview with a click of a button when I’m viewing my page. Once this extension is added to the Chrome browser, you just go to the page, click on the Open Graph Preview button and you can select previews for several popular platforms. The three images below show the previews for the first post in this SEO series, with the first showing the how the preview drops down in the browser, and the other two showing previews for Twitter and Facebook. (Remember that on several other platforms the share will look similar to the Facebook preview.)

On a final note, make sure you include social media sharing icons on every page, post or portfolio, like the ones below my bio at the bottom of this post, to make it easy for people to share your content on their social media sites. There are several WordPress plugins that help you do this. The plugin I use, which is free, is called Ultimate Social Media Icons, but you have many to choose from.
Happy linking!
Lee Reeder is a ghostwriter, writer, editorial project manager, photographer and graphic designer with decades of experience. He has been providing SEO services since 1998. He has also served as a non-profit and for-profit leader and manager.
Like this post? Please share it with your colleagues & friends or visit me on social media.
![]()
![]()
![]()
![]()
![]()
![]()
![]()
![]()